Understanding the 100 Ohm Resistor in Motorcycle Ignition Systems
 Many motorcycle riders are unfamiliar with motorcycle ignition systems, especially when it comes to understanding the role of the 100 ohm resistor. This crucial component is often overlooked, yet it plays a vital role in preventing hot-wiring and theft. Our comprehensive guide will explore the specifics of the 100 ohm resistor, its function, and how it can sometimes be bypassed. In order to activate the Capacitive Discharge Ignition (CDI), the resistor creates a lower voltage. This voltage difference is detected by the bike’s Electronic Control Unit (ECU) and allows the spark plugs to be powered. If a prospective thief tries to hot-wire the bike, the full 12 volts would be applied and the ECU would prevent the spark plugs from firing, thus thwarting the theft attempt.
100 OHM Resistor
 Before we delve into the integration of a 100 ohm resistor in a motorcycle, it is essential to grasp the concept of resistors. A resistor is a passive two-terminal electrical component that resists the flow of current in a circuit. It is commonly used to control or limit the current to other components, ensuring they operate within safe limits. A 100 ohm resistor refers to its resistance value, which is measured in ohms (Ω).
It indicates that the resistor will impede the current flow to a specific degree, allowing only a certain amount of current to pass through. In motorcycle applications, resistors are used to prevent issues like voltage spikes, excessive current, and damage to sensitive components. They also enable compatibility between components designed for different voltage levels.
Kawasaki and the Igntion Resistor
The ignition resistor is a component used in some Kawasaki motorcycle models to control the flow of current to the ignition switch. It is designed to limit the current that passes through the ignition switch, preventing wear and tear on the switch and ensuring proper ignition system operation. However, it’s important to note that not all Kawasaki models are equipped with this resistor. The inclusion of the ignition resistor depends on the specific model and the country in which the motorcycle is purchased.
The connection of a Resistor to an Engine Control Unit (ECU)
The connection of a resistor to an Engine Control Unit (ECU) is a specific application where resistors are used to modify signals or inputs sent to the ECU. This modification can be done for various purposes, such as engine tuning, sensor simulation, or troubleshooting. Let’s explore some common scenarios where resistors are connected to an ECU:
- Sensor Simulation: In some cases, you may need to simulate a sensor’s output to the ECU to test the ECU’s response or diagnose potential issues. For example, if a sensor has failed, you can use a resistor to simulate its output within the expected range. This is often referred to as “bench testing” the ECU.
- Engine Tuning and Modifications: In engine tuning, resistors can be used to modify sensor signals to achieve specific performance goals. For instance, if you are tuning the air-fuel ratio, you might use resistors to alter the signal from the oxygen sensor to make the ECU adjust the fuel injection accordingly.
- Troubleshooting and Diagnostics: Resistors can be employed during troubleshooting to isolate issues with certain sensors or circuits. By connecting a resistor in place of a sensor, you can check if the ECU responds correctly without the sensor’s input.
- Sensor Bypass: In some situations, a faulty sensor might cause the ECU to enter a failsafe mode or limp mode, leading to reduced performance or a complete shutdown. A properly sized resistor can be temporarily connected to bypass the faulty sensor, allowing the ECU to function correctly.
Motorcycle Engine Control Unit (ECU)
Essential component for proper motorcycle ignition system operation
XpertRider partners with retailers like Amazon. We may earn a commission if you purchase through our links at no extra cost to you.
It’s important to note that connecting a resistor to an ECU requires a good understanding of the ECU’s wiring diagram and the specific sensor or circuit you are working with. Using incorrect resistor values or improper connections can lead to adverse effects on the ECU and the overall performance of the vehicle.
Additionally, modifying the ECU with resistors for tuning purposes should be done with caution and expertise. Custom tuning can affect the engine’s reliability, emissions, and overall longevity, and it may also void warranties or violate emissions regulations in some regions.
Symptoms of a Failing Ignition Resistor
| Symptom | What It Means |
|---|---|
| Engine Cranks But Won’t Start | The engine cranks when attempting to start the motorcycle, but it fails to ignite or start properly. |
| Intermittent Starting Issues | Motorcycle may start normally at times but experience starting problems on other occasions. |
| No Response from Starter Motor | The starter motor shows no movement or sound when trying to start the bike. |
| Engine Stalling | The motorcycle’s engine stalls unexpectedly while riding due to ignition circuit interruption. |
| Electrical System Appears Normal | Despite the issue, other electrical components (lights, indicators) seem to function normally. |
| No Ignition System Codes | Modern motorcycles may not display specific error codes for ignition resistor failure. |
| Resistor Damage or Corrosion | Visible signs of damage, burning, melting, or corrosion may be present on the ignition resistor. |
| Electrical Smell | A distinct electrical smell may be noticeable when the ignition resistor overheats or burns. |
| Electrical Noise or Clicking | Unusual electrical noises or clicking sounds may be heard near the ignition system during startup. |
| Failure to Start After Resting | The motorcycle may start after resting, indicating inconsistent current handling by the resistor. |
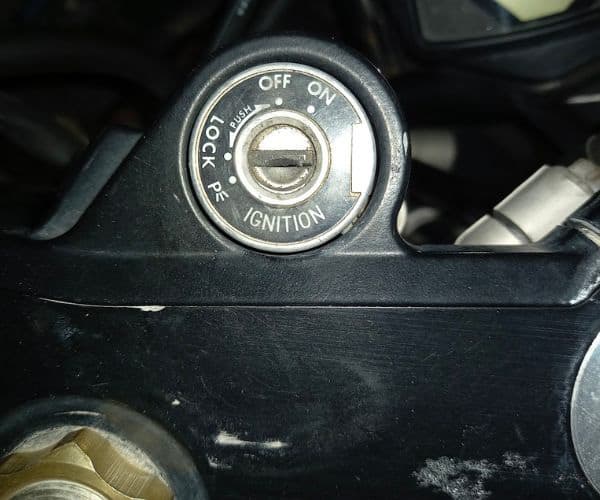
Bypassing the Ignition Switch Resistor
While resistors are generally reliable, failure is a possibility. If the ignition switch resistor does fail, it will need to be bypassed or replaced to get the bike running again. This can be a DIY project if you have some electrical knowledge and the right tools, but if you’re unsure, it may be best to consult a professional.
Necessary Tools and Parts
To bypass the ignition switch resistor, you’ll need the following tools and parts:
- A 100 ohm, 1/2 watt resistor
- Soldering iron
- Solder
- Wire of the same gauge as your current switch wire
- Heat shrink
- Heat gun (a hairdryer may also suffice)
The Bypass Process
 To bypass the ignition switch resistor, follow these steps:
- Remove the ignition switch. The original resistor is located at the bottom of the ignition switch and will need to be accessed. Consult your bike’s manual if you’re unsure how to do this.
- Identify and disconnect the resistor wire. On most bikes, this will be a grey wire, but it’s always best to double-check.
- Identify a suitable switched power cable. This cable must be a switched power supply, meaning it only has voltage when the ignition key is turned.
- Connect the resistor. The new resistor will be connected between the switched power supply and the cable you removed from the ignition switch.
- Solder and protect the connections. The connections should be soldered together and covered with heat shrink for protection.
The 100-ohm resistor in motorcycle ignition switches serves a vital role in preventing hot-wiring and theft. Understanding its function and knowing how to bypass it when necessary can save you considerable frustration and help keep your bike secure. As always, if you’re unsure about performing any of these steps yourself, consult with a professional to avoid damaging your bike’s electrical system.
Join Our Riding Community
Get exclusive gear reviews, riding tips, and early access to deals delivered to your inbox.
No spam. Unsubscribe anytime. We respect your privacy.